Redrawing the Cube in Direct3D Template for Win8-style UI
Even though I had *some* exposure to Direct2D, my first exposure to the Direct3D template in VS2012 for Win8 wasn’t free of confusion. One of the first things I wanted to learn how to do was to draw multiple copies of the prepackaged cube and move them around the world. This blog post describes how I was able to accomplish this. Since I am a Web Developer by trade, I may present techniques that are somewhat unorthodox in my solution; however, I hope the post can still be useful to some that need to find a place to start.
The first thing to do is use VS2012 Express for Win8 to create the Direct3D App Template. You can accomplish that trivial task by:
- going to File->New Project->Templates->Visual C++->Direct3D App
- Entering an appropriate value in the Name TextBox
- Clicking the OK Button
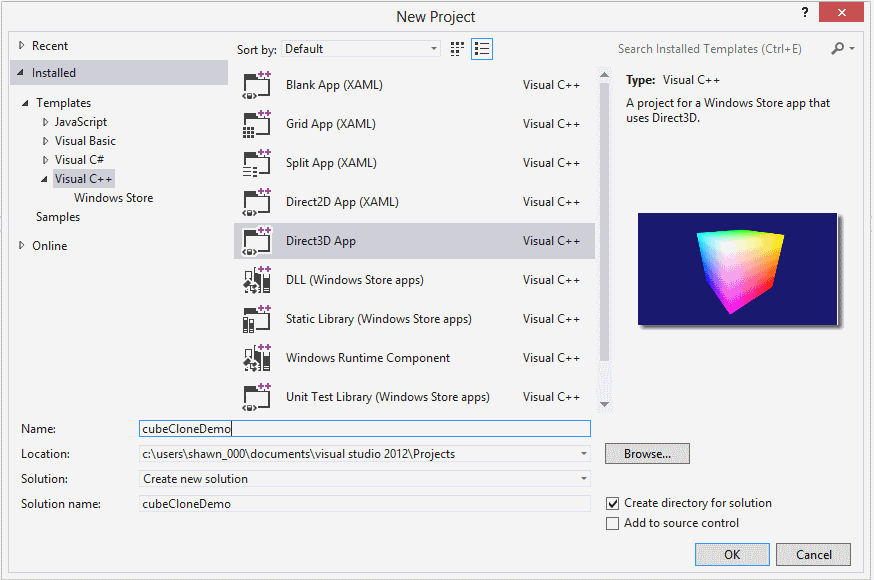
(Image Quality Purposefully Downgraded to Save Bandwidth)
One you create this template, you can run it to see a multicolored cube rotating around the Y-axis. The demo accomplishes this by using the following statement in CubeRenderer::Update of CubeRenderer.cpp:
void CubeRenderer::Update(float timeTotal, float timeDelta)
{
	(void) timeDelta; // Unused parameter.

	XMVECTOR eye = XMVectorSet(0.0f, 0.7f, 1.5f, 0.0f);
	XMVECTOR at = XMVectorSet(0.0f, -0.1f, 0.0f, 0.0f);
	XMVECTOR up = XMVectorSet(0.0f, 1.0f, 0.0f, 0.0f);

	XMStoreFloat4x4(&m_constantBufferData.view, XMMatrixTranspose(XMMatrixLookAtRH(eye, at, up)));

	XMStoreFloat4x4(&m_constantBufferData.model, XMMatrixTranspose(XMMatrixRotationY(timeTotal * XM_PIDIV4)));

}
For this “tutorial” you won’t need this highlighted statement so you can safely comment it out. The end result will give you something like this:
void CubeRenderer::Update(float timeTotal, float timeDelta)
{
	(void) timeDelta; // Unused parameter.

	XMVECTOR eye = XMVectorSet(0.0f, 0.7f, 1.5f, 0.0f);
	XMVECTOR at = XMVectorSet(0.0f, -0.1f, 0.0f, 0.0f);
	XMVECTOR up = XMVectorSet(0.0f, 1.0f, 0.0f, 0.0f);

	XMStoreFloat4x4(&m_constantBufferData.view, XMMatrixTranspose(XMMatrixLookAtRH(eye, at, up)));
	// XMStoreFloat4x4(&m_constantBufferData.model, XMMatrixTranspose(XMMatrixRotationY(timeTotal * XM_PIDIV4)));
}
NOTE: Commenting out the mentioned line will cause the primary cube to disappear, but that isn’t a major concern since you will be making copies of it anyway.
Now, you will want to scroll down to the method were most of the action takes place. Scroll down to the end of CubeRenderer::Render in the same file. You should see some code like this:
void CubeRenderer::Render()
{
    ...
	m_d3dContext->VSSetConstantBuffers(
		0,
		1,
		m_constantBuffer.GetAddressOf()
		);

	m_d3dContext->PSSetShader(
		m_pixelShader.Get(),
		nullptr,
		0
		);

	m_d3dContext->DrawIndexed(
		m_indexCount,
		0,
		0
		);
}
The code of interest is the call to DrawIndexed. You can apply transformations and make multiple calls to this method to draw “copies” of the cube that Microsoft defined in their demo. The transformations you would typically apply are XMMatrixRotation? (Where ? is X, Y or X) (1) and XMMatrixTranslation (2). These are helper methods to keep you from having to do the 3D Linear Algebra yourself. If you are actually interested in learning the some of the Linear Algebra that is behind the Direct3D 4X4 Matrix, you might like at the math presented in the OpenGL tutorial at (3).
For this “tutorial” we want to make copies of the included cube. We might try to make our copies by simply translating the cube a redrawing it like this:
void CubeRenderer::Render()
{
       ...
	XMStoreFloat4x4(&m_constantBufferData.model, XMMatrixTranspose(XMMatrixTranslation(-1.0f, 1.0f, -4.0f)));
	m_d3dContext->DrawIndexed(
		m_indexCount,
		0,
		0
		);
	XMStoreFloat4x4(&m_constantBufferData.model, XMMatrixTranspose(XMMatrixTranslation(1.0f, 1.0f, -4.0f)));
	m_d3dContext->DrawIndexed(
		m_indexCount,
		0,
		0
		);
       ...
}
Unfortunately, if you try that you will probably only see one cube or maybe even none at all. I *think* this is because the actual data used by the VertexShader is stored in the ID311Buffer m_constantBuffer instead of m_constantBufferData which appears to be a user defined helper type. The following code line in the Render method seems to confirm that:
	m_d3dContext->VSSetConstantBuffers(
		0,
		1,
		m_constantBuffer.GetAddressOf()
	);
To get the data from m_constantBufferData to m_constantBuffer we apparently need to use a helper function called UpdateSubresource (4). So to draw four cubes on our screen, we might change the code in our Render function to something like this:
// NOTE: Majority of this code was created by the D3DTemplate that
//       came with VS2012 Express for Win8.  That code may be
//       copyright by Microsoft.  Microsoft retains all rights
//       to its code and the code is listed here only for
//       context purposes.  If you want to use the D3DTemplate
//       that comes with VS2012 Express for Win8, you will need
//       to obtain a free license from Microsoft
//
//       Changes of interest in this code section are emphasized
//       with highlighting
void CubeRenderer::Render()
{
	const float midnightBlue[] = { 0.098f, 0.098f, 0.439f, 1.000f };
	m_d3dContext->ClearRenderTargetView(
		m_renderTargetView.Get(),
		midnightBlue
		);

	m_d3dContext->ClearDepthStencilView(
		m_depthStencilView.Get(),
		D3D11_CLEAR_DEPTH,
		1.0f,
		0
		);

	// Only draw the cube once it is loaded (loading is asynchronous).
	if (!m_loadingComplete)
	{
		return;
	}

	m_d3dContext->OMSetRenderTargets(
		1,
		m_renderTargetView.GetAddressOf(),
		m_depthStencilView.Get()
		);


	// Commented out: This can be done later
	//m_d3dContext->UpdateSubresource(
	//	m_constantBuffer.Get(),
	//	0,
	//	NULL,
	//	&m_constantBufferData,
	//	0,
	//	0
	//);


	UINT stride = sizeof(VertexPositionColor);
	UINT offset = 0;
	m_d3dContext->IASetVertexBuffers(
		0,
		1,
		m_vertexBuffer.GetAddressOf(),
		&stride,
		&offset
		);

	m_d3dContext->IASetIndexBuffer(
		m_indexBuffer.Get(),
		DXGI_FORMAT_R16_UINT,
		0
		);

	m_d3dContext->IASetPrimitiveTopology(D3D11_PRIMITIVE_TOPOLOGY_TRIANGLELIST);

	m_d3dContext->IASetInputLayout(m_inputLayout.Get());

	m_d3dContext->VSSetShader(
		m_vertexShader.Get(),
		nullptr,
		0
		);

	m_d3dContext->VSSetConstantBuffers(
		0,
		1,
		m_constantBuffer.GetAddressOf()
		);

	m_d3dContext->PSSetShader(
		m_pixelShader.Get(),
		nullptr,
		0
		);


	XMStoreFloat4x4(&m_constantBufferData.model, XMMatrixTranspose(XMMatrixTranslation(1.0f, 0.0f, -4.0f)));
	m_d3dContext->UpdateSubresource(
		m_constantBuffer.Get(),
		0,
		NULL,
		&m_constantBufferData,
		0,
		0
	);
	m_d3dContext->DrawIndexed(
		m_indexCount,
		0,
		0
	);


	XMStoreFloat4x4(&m_constantBufferData.model, XMMatrixTranspose(XMMatrixTranslation(0.0f, 1.0f, -4.0f)));
	m_d3dContext->UpdateSubresource(
		m_constantBuffer.Get(),
		0,
		NULL,
		&m_constantBufferData,
		0,
		0
	);
	m_d3dContext->DrawIndexed(
		m_indexCount,
		0,
		0
	);

	XMStoreFloat4x4(&m_constantBufferData.model, XMMatrixTranspose(XMMatrixTranslation(-1.0f, 0.0f, -4.0f)));
	m_d3dContext->UpdateSubresource(
		m_constantBuffer.Get(),
		0,
		NULL,
		&m_constantBufferData,
		0,
		0
	);
	m_d3dContext->DrawIndexed(
		m_indexCount,
		0,
		0
	);

	XMStoreFloat4x4(&m_constantBufferData.model, XMMatrixTranspose(XMMatrixTranslation(0.0f, -1.0f, -4.0f)));
	m_d3dContext->UpdateSubresource(
		m_constantBuffer.Get(),
		0,
		NULL,
		&m_constantBufferData,
		0,
		0
	);
	m_d3dContext->DrawIndexed(
		m_indexCount,
		0,
		0
	);

}
If you make the above changes to your render function and run the program, you *should* hopefully see four cubes on your screen. You can then extend the idea to draw more cubes as you see fit. With that done, it might be interesting for us to perform a trivial animation with the four cubes. Now that we have the basic template in the Render function, it should be some very simply math to specify the correct translations to make the cubes dance around a bit.
Since we used trivial coordinates like (1,0), (0, 1), (-1,0) and (0, -1) it is easy to tell the distance from the origin to each cube is simply 1. So another way to draw each of these cubes would be to first express their positions in polar coordinates (5) and then translate those coordinates into rectangular coordinates. If we express each cube location in polar coordinates, then we should have something like this (1, 0π/2), (1, 1π/2), (1, 2π/2), and (1, 3π/2) or simply (1,0), (1, π/2), (1, π) and (1, 3π/2). If we express the cube locations in polar coordinates, it will become trivial to rotate those cubes in a counter-clockwise circle but we will get to that later. To do express the cube locations in polar coordinates, we are going to replace the four groups of drawing calls inside a loop that is called four times. Initially, it will look something like this:
void CubeRenderer::Render()
{
       ...

	m_d3dContext->VSSetConstantBuffers(
		0,
		1,
		m_constantBuffer.GetAddressOf()
		);

	m_d3dContext->PSSetShader(
		m_pixelShader.Get(),
		nullptr,
		0
		);

	for (int i = 0; i < 4; i++) {
		XMStoreFloat4x4(&m_constantBufferData.model, XMMatrixTranspose(XMMatrixTranslation(1.0f, 0.0f, -4.0f)));
		m_d3dContext->UpdateSubresource(
			m_constantBuffer.Get(),
			0,
			NULL,
			&m_constantBufferData,
			0,
			0
		);
		m_d3dContext->DrawIndexed(
			m_indexCount,
			0,
			0
		);
	}
}
Unfortunately, this only *appears* to draw one cube since all of the clones are getting dumped on the original cube. We can fix that by introducing the polar coordinates mentioned earlier. This will yield code similar to the following:
void CubeRenderer::Render()
{
       ...

	m_d3dContext->VSSetConstantBuffers(
		0,
		1,
		m_constantBuffer.GetAddressOf()
		);

	m_d3dContext->PSSetShader(
		m_pixelShader.Get(),
		nullptr,
		0
		);

	for (int i = 0; i < 4; i++) {

		float angleOfCurrentCube = (float)i * (3.14f/2.0f);  // 3.14 is a *gross* approximation of PI
		float x = 1.0f * cos(angleOfCurrentCube);
		float y = 1.0f * sin(angleOfCurrentCube);

		XMStoreFloat4x4(&m_constantBufferData.model, XMMatrixTranspose(XMMatrixTranslation(x, y, -4.0f)));
		m_d3dContext->UpdateSubresource(
			m_constantBuffer.Get(),
			0,
			NULL,
			&m_constantBufferData,
			0,
			0
		);
		m_d3dContext->DrawIndexed(
			m_indexCount,
			0,
			0
		);
	}
}
Now, comes the easy part. Do you remember when I said converting using polar coordinates would make it easy for use to rotate the cubes? Now that we have started using polar coordinates, all we have to do to dance the cubes in a counter-clockwise circle is add a small radial offset to angleOfCurrentCube each frame and modulate across 2π to keep the number from growing to infinity. This new changes are listed below (Note that a static variable is used for convenience):
void CubeRenderer::Render()
{
	...

	static float animateOffset = 0.0f;
	animateOffset += 0.01f;
	float const twoPI = (2.0f * 3.14f);

	for (int i = 0; i < 4; i++) {
		float angleOfCurrentCube = (float)i * (3.14f/2.0f);  // 3.14 is a *gross* approximation of PI

		angleOfCurrentCube = angleOfCurrentCube + animateOffset;
		while (angleOfCurrentCube > twoPI) {
			angleOfCurrentCube -= twoPI;
		}


		float x = 1.0f * cos(angleOfCurrentCube);
		float y = 1.0f * sin(angleOfCurrentCube);
		XMStoreFloat4x4(&m_constantBufferData.model, XMMatrixTranspose(XMMatrixTranslation(x, y, -4.0f)));
		m_d3dContext->UpdateSubresource(
			m_constantBuffer.Get(),
			0,
			NULL,
			&m_constantBufferData,
			0,
			0
		);
		m_d3dContext->DrawIndexed(
			m_indexCount,
			0,
			0
			);
	}
}
This code causes four of the cubes that come with the Direct3D template to move around in a counter-clockwise circle.
Next, just for interest, we should probably provide another DirectX transformation. We should probably rotate the cubes around their y axis just for fun. To do this, we simply use XMMatrixRotationY (6). Fortunately for us, the function takes its input in radians so we can take the easy way out and simply reuse angleOfCurrentCube. We pass angleOfCurrentCube straight into XMMatrixRotationY and simply multiply it by our XMMatrixTranlation transformation to complete the transposition. The order does matter. I’m not sure of the exact technical details but the rotation must come before the translation. The new render code looks like this with recent changes:
// NOTE: Majority of this code was created by the D3DTemplate that
//       came with VS2012 Express for Win8.  That code may be
//       copyright by Microsoft.  Microsoft retains all rights
//       to its code and the code is listed here only for
//       context purposes.  If you want to use the D3DTemplate
//       that comes with VS2012 Express for Win8, you will need
//       to obtain a free licesne from Microsoft
//
//       Shawn Eary's changes are hightlighted
void CubeRenderer::Render()
{
	const float midnightBlue[] = { 0.098f, 0.098f, 0.439f, 1.000f };
	m_d3dContext->ClearRenderTargetView(
		m_renderTargetView.Get(),
		midnightBlue
		);

	m_d3dContext->ClearDepthStencilView(
		m_depthStencilView.Get(),
		D3D11_CLEAR_DEPTH,
		1.0f,
		0
		);

	// Only draw the cube once it is loaded (loading is asynchronous).
	if (!m_loadingComplete)
	{
		return;
	}

	m_d3dContext->OMSetRenderTargets(
		1,
		m_renderTargetView.GetAddressOf(),
		m_depthStencilView.Get()
		);

	// Commented out Blog Post: This will be done later
	//m_d3dContext->UpdateSubresource(
	//	m_constantBuffer.Get(),
	//	0,
	//	NULL,
	//	&m_constantBufferData,
	//	0,
	//	0
	//);

	UINT stride = sizeof(VertexPositionColor);
	UINT offset = 0;
	m_d3dContext->IASetVertexBuffers(
		0,
		1,
		m_vertexBuffer.GetAddressOf(),
		&stride,
		&offset
		);

	m_d3dContext->IASetIndexBuffer(
		m_indexBuffer.Get(),
		DXGI_FORMAT_R16_UINT,
		0
		);

	m_d3dContext->IASetPrimitiveTopology(D3D11_PRIMITIVE_TOPOLOGY_TRIANGLELIST);

	m_d3dContext->IASetInputLayout(m_inputLayout.Get());

	m_d3dContext->VSSetShader(
		m_vertexShader.Get(),
		nullptr,
		0
		);

	m_d3dContext->VSSetConstantBuffers(
		0,
		1,
		m_constantBuffer.GetAddressOf()
		);

	m_d3dContext->PSSetShader(
		m_pixelShader.Get(),
		nullptr,
		0
		);

	static float animateOffset = 0.0f;
	animateOffset += 0.01f;
	float const twoPI = (2.0f * 3.14f);
	for (int i = 0; i < 4; i++) {
		float angleOfCurrentCube = (float)i * (3.14f/2.0f);  // 3.14 is a *gross* approximation of PI
		angleOfCurrentCube = angleOfCurrentCube + animateOffset;
		while (angleOfCurrentCube > twoPI) {
			angleOfCurrentCube -= twoPI;
		}

		float x = 1.0f * cos(angleOfCurrentCube);
		float y = 1.0f * sin(angleOfCurrentCube);
		XMStoreFloat4x4(&m_constantBufferData.model,
			XMMatrixTranspose(
				XMMatrixRotationY(angleOfCurrentCube) *
				XMMatrixTranslation(x, y, -4.0f)
			)
		);
		m_d3dContext->UpdateSubresource(
			m_constantBuffer.Get(),
			0,
			NULL,
			&m_constantBufferData,
			0,
			0
		);
		m_d3dContext->DrawIndexed(
			m_indexCount,
			0,
			0
			);
	}
}
Now: A Bit off the Deep End ☺...
That’s still a bit boring and looks too much like what Microsoft did in the Direct3D demo. Why not try to apply a Yo-Yo like effect to the cube rotations? That may not be too terribly interesting but at least it’s better than what we have done so far. The best Yo-Yo like think I can think of is the classic Calculus example of a ball travelling through the air. Unfortunately, I didn’t see very many good sources on the internet for this so you will just have to follow me through on this one. There does happen to be an example of this on Pages 791-792 of (7) but that has a bit of unnecessary vector Calculus in the write up. You might be wondering why I am going of the deep end with Calculus in a trivial Direct3D blog but this is my blog and I can say whatever I want ☺. Anyway, the basic pattern of a projectile in an ideal space with no drag looks something like this:
Our Yo-Yo effect will for the most part follow this equation. The effect we want to achieve is that cubes on the far right of the x axis will have no radial velocity around y-axis with acceleration in the counter clockwise direction while cubes in the far left of the x axis will have no radial velocity around y-axis with acceleration in the clockwise direction. It would be hard to come up with an equation for all four quadrants so we will restrict the problem to only two of the quadrants at a time. In our case, it is easiest to focus on the 1st and 4th quadrants.
To start off let’s just guess that our radial acceleration will be a constant -10 radians per second squared. We can then trivially know that our acceleration function in the 4th and 1st quadrants is:
(where t is from 0 to π radians and 0 starts in 4th quadrant)or more simply just
Now, we want to come up with an equation that lets us know the exact radial rotation or position. We can get there with elementary Calculus, but we have to integrate twice. The first integral will give us the equation for angular velocity:
or more simply:
The problem here is that we don’t know what vro is, but I just told you a while back that we want the radial velocity to zero when a cube is positioned on the x axis. Since we are treating both the 4th and 1st quadrants as a single unit, the x axis would occur at . We can then plug these numbers into our radial velocity equation to get vro. Below is an example:
So we then know that the initial velocity when a cube starts on the lower part of the y axis should be 5π. We can plug this number back into the equation for radialVelocity vr and get a more precise result:
Finally, we can integrate one last time to get the equation for radial position:
Or more simply:
but in our particular case we can just assume that r0 is zero so we have this for the final equation of radial position:
So you are probably wondering why I went off the deep end with Calculus when I could have simply used and iterative type solution. The iterative type solution would have needed to too keep track of more variables and it would have made it harder for me to guarantee that the angular position on the x axis was zero. In this particular case, doing the match ahead of time makes the solution cleaner. Although I will admit that in *most* cases using iterative approximations for object dynamics is usually easier.
Once we have applied these changes, the final set of changes should look something like this
// This equation is typical of equations you see in classic
// Calculus books.   I'm using it in two different cases
// to create something of a Yo-Yo rotational effect
// The first term is the contribution due to the radial accereration
// (-5.0) * (t*t)
// The second term is the contribution due to the radial velocity
// (-5.0f * PI) * t
float const angularRotationEquation(float const t) {
	return ((-5.0f) * (t*t)) + ((5.0f) * (3.14f) * t);
}

// This part gets a bit tedious.  It breaks the four quadrants
// into two parts.  The 1st and 4th quadrants being in the first half
// and the 2nd and 3rd quadrants being in the second half.   Cubes
// in the first half have a radial accelleration in the
// counter-clockwise direction as seen looking down from the sky
// while cubes in the second half a a radial accelleration in the
// opposite direction
float const getAngularRotation(float const radialCubePos) {
	float const threePiOverTwo = (3.0f * 3.14f) / 2.0f;
	float const PiOverTwo = 3.14f / 2.0f;
	if (
		(radialCubePos >= threePiOverTwo) ||
		(radialCubePos <= PiOverTwo)
	) {
		// The cube of interest is in the first half,
		// we should apply a counter clockwise rotation
		if (radialCubePos >= threePiOverTwo) {
			// The cube of interest is in the fourth
			// quadrant.  We want to normalize its (time)
			// to a scale from zero to PI.  We can do
			// that by subtracting threePiOverTwo from
			// its circular position
			// (The circular position is treated as time
			//  for the angularRotationEquation)
			return 0.0f - angularRotationEquation(
				radialCubePos - threePiOverTwo
			);
		} else {
			// The cube of interest is in the first
			// quadrant.  We want to normalize its (time)
			// to a scale from zero to PI.  We can do
			// that by simply adding PI/2.0 to current
			// circular position
			return 0.0f - angularRotationEquation(
				radialCubePos + PiOverTwo
			);
		}
	} else {
		// the cube of interest is in the second half,
		// we should apply a clockwise rotation
		// (Opposite of what was done in the first half)
		//
		// Because both quadrants (2&3) in the second half
		// don't wrap around 2PI, we don't have to have two
		// different cases for normalization like we did
		// for the first half.  We can simply subtract the
		// offset from the first quadrant which is PI/2
		return angularRotationEquation(
			(radialCubePos - PiOverTwo)
		);
	}
}


// NOTE: Majority of this code was created by the D3DTemplate that
//       came with VS2012 Express for Win8.  That code may be
//       copyright by Microsoft.  Microsoft retains all rights
//       to its code and the code is listed here only for
//       context purposes.  If you want to use the D3DTemplate
//       that comes with VS2012 Express for Win8, you will need
//       to obtain a free licesne from Microsoft
//
//       Shawn Eary's changes are hightlighted
void CubeRenderer::Render()
{
	const float midnightBlue[] = { 0.098f, 0.098f, 0.439f, 1.000f };
	m_d3dContext->ClearRenderTargetView(
		m_renderTargetView.Get(),
		midnightBlue
		);

	m_d3dContext->ClearDepthStencilView(
		m_depthStencilView.Get(),
		D3D11_CLEAR_DEPTH,
		1.0f,
		0
		);

	// Only draw the cube once it is loaded (loading is asynchronous).
	if (!m_loadingComplete)
	{
		return;
	}

	m_d3dContext->OMSetRenderTargets(
		1,
		m_renderTargetView.GetAddressOf(),
		m_depthStencilView.Get()
		);

	// Commented out Blog Post: This will be done later
	//m_d3dContext->UpdateSubresource(
	//	m_constantBuffer.Get(),
	//	0,
	//	NULL,
	//	&m_constantBufferData,
	//	0,
	//	0
	//);

	UINT stride = sizeof(VertexPositionColor);
	UINT offset = 0;
	m_d3dContext->IASetVertexBuffers(
		0,
		1,
		m_vertexBuffer.GetAddressOf(),
		&stride,
		&offset
		);

	m_d3dContext->IASetIndexBuffer(
		m_indexBuffer.Get(),
		DXGI_FORMAT_R16_UINT,
		0
		);

	m_d3dContext->IASetPrimitiveTopology(D3D11_PRIMITIVE_TOPOLOGY_TRIANGLELIST);

	m_d3dContext->IASetInputLayout(m_inputLayout.Get());

	m_d3dContext->VSSetShader(
		m_vertexShader.Get(),
		nullptr,
		0
		);

	m_d3dContext->VSSetConstantBuffers(
		0,
		1,
		m_constantBuffer.GetAddressOf()
		);

	m_d3dContext->PSSetShader(
		m_pixelShader.Get(),
		nullptr,
		0
		);

	static float animateOffset = 0.0f;
	animateOffset += 0.01f;
	float const twoPI = (2.0f * 3.14f);
	for (int i = 0; i < 4; i++) {
		float angleOfCurrentCube = (float)i * (3.14f/2.0f);  // 3.14 is a *gross* approximation of PI
		angleOfCurrentCube = angleOfCurrentCube + animateOffset;
		while (angleOfCurrentCube > twoPI) {
			angleOfCurrentCube -= twoPI;
		}

		float x = 1.0f * cos(angleOfCurrentCube);
		float y = 1.0f * sin(angleOfCurrentCube);
		XMStoreFloat4x4(&m_constantBufferData.model,
			XMMatrixTranspose(
				XMMatrixRotationY(

					getAngularRotation(angleOfCurrentCube)

				) *
				XMMatrixTranslation(x, y, -4.0f)
			)
		);
		m_d3dContext->UpdateSubresource(
			m_constantBuffer.Get(),
			0,
			NULL,
			&m_constantBufferData,
			0,
			0
		);
		m_d3dContext->DrawIndexed(
			m_indexCount,
			0,
			0
			);
	}
}
And the resulting Direct3D render should look somewhat like this crude rendering (Note: Demonstrated GIF is lower quality than actual Direct3D rendering due to low frame rate and color loss):
We have now had a little bit of time to have some fun with the Direct3D demo that comes with VS2012 Express for Win8. With these basics, you should be easily able to combine the cubes in numerous ways to create crude animations. Sorry, I went off on the deep end with the Calculus. I just wanted to throw some variety in there…
Best,
Shawn
Bibliography
1. Microsoft. XMMatrixRotationX method (Windows).
Windows Dev Center - Desktop. [Online] OCT 16, 2012.
[Cited: NOV 17, 2012.]
http://msdn.microsoft.com/en-us/library/windows/desktop/microsoft.directx_sdk.matrix.xmmatrixrotationx(v=vs.85).aspx
2. Microsoft. XMMatrixTranslation method (Windows).
Windows Dev Center - Desktop. [Online] OCT 16, 2012.
[Cited: NOV 17, 2012.]
http://msdn.microsoft.com/en-us/library/windows/desktop/microsoft.directx_sdk.matrix.xmmatrixtranslation(v=vs.85).aspx
3. ARon. Space and Matrix Transformations - Building a 3D Engine.
Code Project. [Online] SEP 04, 2009.
[Cited: NOV 17, 2012.]
http://www.codeproject.com/Articles/42086/Space-and-Matrix-Transformations-Building-a-3D-Eng
4. Microsoft. ID3D11DeviceContext::UpdateSubresource method (Windows).
Windows Dev Center - Desktop. [Online] OCT 16, 2012.
[Cited: DEC 02, 2012.]
http://msdn.microsoft.com/en-us/library/windows/desktop/ff476486(v=vs.85).aspx
5. Various. Polar Coordinate System.
Wikipedia. [Online] NOV 2012, 20.
[Cited: DEC 2012, 02.]
http://en.wikipedia.org/wiki/Polar_coordinates
6. Microsoft. XMMatrixRotationY method (Windows).
Windows Dev Center - Desktop. [Online] OCT 10, 2012.
[Cited: DEC 6, 2012.]
http://msdn.microsoft.com/en-us/library/windows/desktop/microsoft.directx_sdk.matrix.xmmatrixrotationy(v=vs.85).aspx
7. Larson, Roland, Hostetler, Robert and Edwards, Bruce. Vector-Valued Functions: Velocity and Acceleration.
Calculus 4th Edition.
Lexington : D.C. Heath and Company, 1990.
c2012 - Shawn Eary
Allowed content is released under the Free Christian Document License (FCDL)
Microsoft content and other content is subject the license of that content's authors.